The downside of this, of course, is the 4 weeks I have to get EVERYTHING done. That includes my Computer Vision independent study, Clinic, Clinic presentation, Clinic poster, Clinic report, Photography, Philosophy of Mind, and tools.
Tools is my current favorite. I'm making my hammer now, and I just finished all the work that I need to do on the metal lathe. A quick search of my archives tells me that I haven't actually talked about tools yet, which is strange since I really enjoy it and I'm taking it for pure enjoyment. Tools, or E-8, is one of the first engineering classes that prospective engineering students take at Mudd. It's the introductory shop course, called "Tools" because that's what you build. You use the sheet-metal shop to craft a tool tray, bending, cutting and welding sheet metal into shape. You use the metal shop to build a flat head screwdriver, and most of a machinist's hammer (something like this, with one face made of nylon and the other of hardened steel). You use the wood shop to build the hammer handle.
I have not yet made my tool tray, but I've finished my screwdriver and much of my hammer. The screwdriver handle is made from acrylic using the lathe and the mill, and the blade is made on the mill. The hammer is the most complex piece. The hammer head (a short piece of 1in steel bar stock) is machined on the lathe and mill to fit the handle and both faces. The handle is made with the band-saw and wood lathe followed by a LOT of sanding. The hard face is machined from carbon steel on the lathe, followed by some filing, and then heat treated to bring it up to full hardness. It's polished by sand-blasting and fits into the head by press-fitting. The soft face is made from nylon (the nicest material I've worked with on the lathe) and attaches to the head with a screw. I'll post pictures of my pieces when I get off my butt and take some pictures (possibly tomorrow).
The shop proctors tried to chastise me when I told them (on, say, Wednesday night) that I hadn't started my hammer yet (due Friday of the following week). I corrected them. I am not a sophomore engineering student with no time. I'm a senior computer science student taking this class for fun. I can be in the shop every morning for 3 hours if I feel like it, and if I don't feel like it, I can drop the class (HMC's drop date is insanely late in the semester) or turn in half a hammer. It's a good way to approach the class.
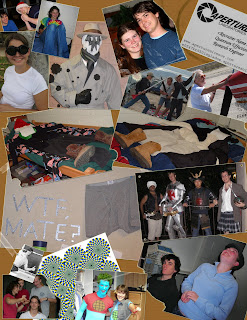
In other news, I photoshopped up my senior page for the yearbook yesterday. Each senior gets a full page in the yearbook to decorate as desired, so I sifted through my (meagre) photo collection and placed the pictures on a canvas in Photoshop.
 The pictures include me eating a Chinese-Donut-Burger, my barnstormers co-president, my girlfriend, my roommate (first three years; we have singles now), a prank some friends and I pulled, a prank some friends pulled on me, a few Halloween costumes (I'm the Rorschach near the top), me getting my head shaved for a friend who had cancer sophomore year (he's doing fine and back at school), the boxers a friend decided to hang on her wall after finding them in her laundry, the Mudd Amateur Rocketry Club at ROCStock a few years ago, Iris Critchell with her Cessna 172, and Rotsnake. And lots of gratuitous Photoshop effects.
I discovered Photoshop brush packs. Thus I have a coffee stain, ink stain, and crinkled-paper effects. The torn edges, actually, are incredibly simple to do in newer versions of Photoshop: turn on layer-effects and add a drop shadow, inner glow and outer glow to the layer. That gives the very slight drop-shadow to create some depth in the image and a thin white border to each picture. Take the eraser tool and grab a ragged brush, then erase the corners/edges of the photo. The white border now looks like torn paper where you've erased the image. I used this to create pinholes, torn corners where pushpins may have been ripped out, and half-ripped photographs. Putting the whole thing on a wooden surface gave it a bit more context, and I couldn't resist the coffee stain. The tape strikes me as a bit cheesy, but not too much and I had just learned how to make the tape.
As for post-graduation plans, I'm not sure yet where I'll be working; I have an offer from DreamHost, and I'm waiting on a few more. I'll probably take the summer off, though, and start in the fall. Over the summer I think I might take some classes at The Crucible in Oakland and visit old friends.
~KMarsh


No comments:
Post a Comment